2026 How to Install Suspended Ceiling Grid for Beginners
Installing a Suspended Ceiling Grid can transform any space, adding aesthetics and functionality. According to industry reports, the global market for suspended ceilings is projected to grow significantly, driven by rising demand in residential and commercial sectors. In fact, the market is anticipated to reach over $7 billion by 2026.
When beginners attempt this installation, they may encounter challenges. Accurate measurements, the right tools, and proper techniques are essential for success. Misalignments can lead to uneven ceilings, which detracts from the overall appearance. Moreover, inadequate support can compromise the integrity of the grid, leading to sagging tiles.
A well-executed suspended ceiling not only improves the look of a room but also enhances acoustics and energy efficiency. While the process may seem daunting, understanding key elements can make a difference. As you embark on your installation journey, remember that learning from mistakes is part of the experience. Embrace the opportunity to create an appealing space step by step.

Understanding Suspended Ceilings: Basics for Beginners
Suspended ceilings are a popular choice in many commercial and residential spaces. They provide a neat appearance while concealing ductwork and electrical wiring. According to a report by the U.S. Department of Energy, about 30% of building energy use is related to heating and cooling. A suspended ceiling can play a role in improving energy efficiency by providing better insulation.
Understanding the basics of suspended ceilings is essential for beginners. They consist of a grid system that supports tiles or panels. This grid can be made from metal or other materials. The installation process can seem daunting. Many beginners might struggle with measurements and alignment. An improperly aligned grid can lead to gaps, making it less visually appealing and less effective for insulation.
When installing, it's crucial to consider the height of the ceiling. This decision affects light fixture placement and overall aesthetics. Attention to detail is key. Common issues arise from inaccurate measurements or underestimating the weight of tiles. Some tiles may sag or warp if not properly supported. Taking the time to learn about installation will help avoid these pitfalls, ultimately leading to a more successful project.
Essential Tools and Materials for Installing Ceiling Grid
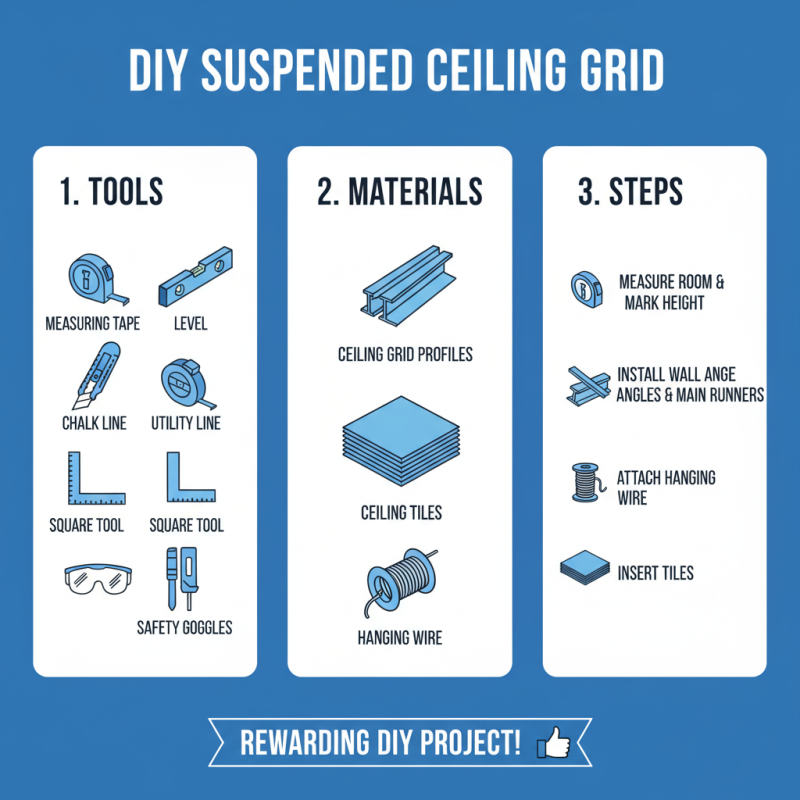
Installing a suspended ceiling grid can be a rewarding DIY project. To get started, having the right tools and materials is essential. You will need a measuring tape, level, chalk line, and a utility knife. A square can help ensure your grid lines are straight. Safety goggles are a must for protection during cutting and installation.
The materials you need include ceiling grid components, such as main tees, cross tees, and wall angles. These pieces fit together to form the grid structure. Don’t forget to have ceiling tiles ready, as they will fill in the grid. Installation will require some care. Measure each section precisely; an oversight can lead to uneven lines and gaps. You might find it frustrating if pieces do not align well. It’s important to take your time.
Proper spacing between grid elements can be tricky. You might have to re-adjust multiple times before getting it right. Keep the tools handy, as adjustments may be necessary during installation. Miscalculations can make the entire grid look off. Being patient and precise will lead to a better outcome.
Step-by-Step Guide to Measuring and Marking the Ceiling
Measuring and marking your ceiling accurately is crucial for installing a suspended ceiling grid. Begin by gathering the necessary tools, such as a measuring tape, chalk line, and level. Measure the dimensions of your room carefully. Take note of any obstructions, like pipes or lights. It’s common to overlook these elements, resulting in misalignments later.
Once you have your measurements, start marking the ceiling. Use a chalk line to create straight guides where the grid will be installed. This method ensures that all the lines are perfectly straight. Double-check your markings. It’s easy to make mistakes. If a line isn’t straight, your entire design will look off.
Carefully consider the height of your grid as well. Marking the correct height is essential. A lower grid can make the room feel cramped. On the other hand, too high might affect the aesthetics. It’s a balancing act. Before you proceed, ask a friend to review your markings. A fresh set of eyes can catch errors you may have missed. Taking these steps will help in achieving a successful installation.
Installing the Main and Cross Tees: Techniques Explained
Installing the main and cross tees in a suspended ceiling grid is key to a successful project. Begin by marking the level lines on the walls. Use a level to ensure accuracy. This step is crucial; even a slight miscalculation can lead to problems later.
Next, position the main tees along the marked lines. Space them according to your ceiling plan. It’s important to secure them properly. Use appropriate hangers to attach the tees to the ceiling. This may require adjusting lengths, which can be tricky but is necessary for stability.
Then, install the cross tees. They should fit snugly between the main tees. If they don’t align correctly, it might be challenging to fit the tiles later. Measure twice before cutting. Mistakes in this step can lead to wasted materials. It’s okay to learn as you go, but attention to detail is essential for a neat finish.
2026 How to Install Suspended Ceiling Grid for Beginners - Installing the Main and Cross Tees: Techniques Explained
| Step |
Technique |
Description |
Time Required |
| 1 |
Planning |
Measure ceiling dimensions and plan layout. |
2 hours |
| 2 |
Marking |
Mark the location of the main tees on the wall. |
1 hour |
| 3 |
Installing Main Tees |
Attach main tees to the marked locations. |
3 hours |
| 4 |
Installing Cross Tees |
Install cross tees between the main tees. |
2 hours |
| 5 |
Adjusting |
Ensure all tees are level and adjust if necessary. |
1 hour |
| 6 |
Installing Tiles |
Place ceiling tiles into the grid. |
2 hours |
Finishing Touches: Adding Ceiling Tiles and Accessories
When finishing a suspended ceiling, adding tiles and accessories can elevate the overall look. Choose tiles that match your style. Consider textures, colors, and patterns. Do not shy away from bolder designs; they can add character. For instance, a grid of bright metal tiles can create a modern feel.
Installing the tiles is straightforward but requires attention. Press each tile into the grid gently. Ensure a snug fit to avoid gaps. Gaps can be distracting and make the installation look unprofessional. Accessories like trim and molding enhance the edges where the ceiling meets the wall. This is often overlooked but crucial for a polished finish.
Take your time with the details. Small imperfections can stand out. Ensure all tiles are aligned. A tilted tile can ruin the aesthetic appeal. Step back occasionally to view your work from different angles. It’s easy to miss flaws when focused on detail. Complete the look with lighting fixtures that complement your ceiling. Fixtures can create warmth and depth, enhancing your space beautifully.
Installation Steps for Suspended Ceiling Grid